Sunday, 28 December 2014

Modify Windows 8.1 OR Windows 10

Why to modify your Windows 8.1 or Windows 10 installation?
  • When you load your computer with a copy of Windows 8.1, you get quit a bunch of crap apps you're sure you will never use.
  • Planning to re-install or fresh install Windows 8.1 in your PC? Here's a bunch of things you could do to save your time every time to install Windows.
  1. Integrate all your drivers in the Windows installation ISO itself. 
  2. Integrate all your applications, software's, games etc all in your Windows installation ISO.
  3. "Modify!" i.e remove the unnecessary programs, software's, applications.
  4. Integrate the latest Windows up-dates to your Windows installation ISO. 
 Prerequisites:

  • WinReducer 8.1 (Download from here or here ).
  • Windows ISO.
  • Virtual machine simulator (Download Virtual Box here). We will need it to check the modified ISO.
How?

Step 1: Setting up the tool.
  • Extract winreducer81.zip.
  • Launch WinReducer81.exe
  •  Ignore the error message by clicking OK.
  • A configuration window will be displayed on the screen. Under "Software Detection" section, click on the name of each software to download them automatically.

  • After all the downloads are completed you will see that the indicators in front of names of the software's are now turned on.
  • Close the OPTIONS window. Tool is now ready!!
Step 2: Editing the ISO.
  • Now click on 'START' and then on 'ISO' and browse to the folder containing the Windows ISO.
  • Now mount the ISO.
Once you mount, you can start with the editing of your ISO.
Now you will see various tabs at the top, each representing the operations you can perform on your ISO.
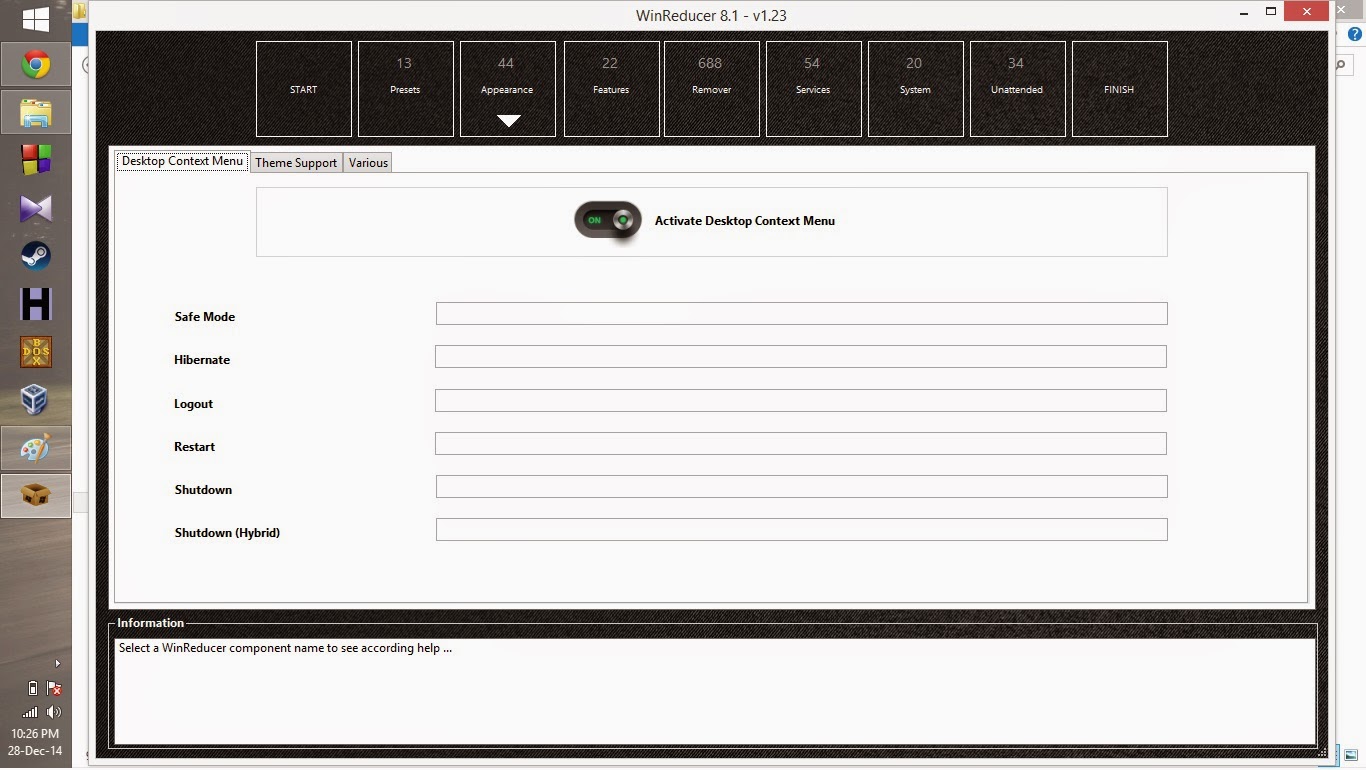
  • Presets: This is used to apply any preset configuration that you have used or saved in the WinReducer, so we wont be using this one.
  • Appearance: Under this tab you will find three more tabs.
    Desktop context menu: here you can add options which are generally not available in the 'Desktop context menu'.
    Theme support: Here you can edit the things related to Themes of Windows 8.1. you can also edit different backgrounds, like 'setup screen', 'lockscreen', 'logo' etc. You can also create your own cursor definition for the Windows. Many more options to explore.
    Various: This tab offers you to edit options like 'Control Panel View', 'Mouse-Sensitivity' 'Taskbar Position', 'Taskbar Size', etc.


  • Features: In features tab you can remove multiple Windows features.
  • Remover: From remover tab you can remove multiple apps that you may find unnecessary and you can also remove some other features.

  • Services: Using this tab you can disable and enable different Windows services.
  • System: Use this tab to integrate drivers and Windows updates which are not available in the present ISO. You can also integrate your own registry tweaks.
  • Unattended: Using this tab you can make the complete setup automated.

Step 3: Saving the ISO.

  • Next go on the FINISH tab and turn on 'WIM or ISO configuration' and click on apply.
Now sit back and relax till the process is complete.

  • Once all the changes are applied, 'ISO Creator' windows shows up, configure it accordingly and click SAVE.

Wait until the ISO File Creator says "Your new customized ISO has been created successfully..."
All Done!! Now before you use this Customized ISO on your system, install it in a Virtual Machine to see if everything works fine. If you don't know how to install ISO on virtual machine please go through the following tutorial. -->Install any OS on Virtual Machine using Virtual Box.


Saturday, 27 December 2014

Installing Ubuntu 14.04 on a Virtual Machine

This tutorial will enable you to install Ubuntu 14.04 (or any other OS) on a virtual machine using Virtual Box.

Download and install Virtual Box LINK
  • Launch Virtual Box and Click on 'new' and select the type of OS i.e Linux of Windows and its version.
    Here for instance Type is Linux and Version is Ubuntu. Type any random name.
  • Click Next and create a virtual hard drive (option 2)
  • Allocate memory (RAM) to your virtual machine.
  • Now select the type of storage (Dynamic preferred)
  • Now select the storage size you want to allocate to the hard drive (8GB enough for ubuntu) and type a name for the same.
Click on create and new virtual machine is now created.

  • Now click on settings, and select storage, now under 'Storage Tree', 'Controller:IDE' select 'VBoxGuestAdditions.iso'.
    Now in Attributes click on the CD icon and select 1st option i.e 'Choose virtual CD/DVD disk file' to load the ISO of respective OS.
    Now click 'OK' to save the settings.
  • After saving the storage settings, start the virtual machine. You will see the installation screen for Ubuntu.
  • Now proceed with the normal method of installing Ubuntu. If you don't know how to install or setup Ubuntu, then refer the following tutorial regarding installation of Ubuntu from "Step: 7".
    Install Ubuntu on presinstalled 8.1 system!!

Wednesday, 24 December 2014

Uninstalling Ubuntu with or without Windows recovery/installation CD/DVD

There are two parts in Uninstalling Ubuntu or any "Linux distro",
  1. Removing GRUB : It is a booloader which is installed manually or automatically when we setup any Linux distro.
  2. Deleting the Partitions: Partitions allocated to Ubunu are deleted and then used to extend the size of drives.

To remove GRUB:
  1. Grab a Windows recovery media or installation CD and boot from it. You should see this on arecovery media CD.
    enter image description here
    And you should see this on an installation media CD. Click "Repair your computer" and you should see a screen like the first image. Image from bleepingcomputer.com
  2. Open the Command Prompt, then type bootrec /fixmbr into the Command Prompt.
    enter image description here
  3. Reboot and boot into Windows. Then follow the steps below to remove the Ubuntu partitions.
    (Images from HowtoGeek)
  4. NOTE: This command works only if your Windows on an MBR partition table, if your Windows is installed on GPT partition table use this command "bootrec /fixboot".

If you don't have a Windows recovery CD or you are constrained to download and burn the ISO files mentioned before, you can use Boot-repair. It is a tool that fixes most boot problems(Windows or Ubuntu). I suggest using a Windows CD if possible.
To use boot repair:
  1. Boot from a Ubuntu live CD or USB
  2. Type these lines in the terminal one line at a time.
    sudo add-apt-repository ppa:yannubuntu/boot-repair
    sudo apt-get update
    sudo apt-get install boot-repair
    
  3. Search for Boot-Repair in the Dash and launch it.
    enter image description here
    To fix your computer with Boot-repair, simply click the "Recommended Repair" button. Then follow the steps below to remove the Ubuntu Partitions.

To delete the Ubuntu Partitions:
  1. Go to Start, right click Computer, then select Manage. Then select Disk Management from the sidebar.
    enter image description here
  2. Right-click your Ubuntu partitions and select "Delete". Check before you delete!
  3. Then, right-click the partition that is on the Left of the free space. Select "Extend Volume". Go through the Wizard and Finish it. enter image description here
  4. Done!

Tuesday, 23 December 2014

Great Google secrets


Google is clearly the best search engine on the Web.

But most people don't use it to its best advantage. Do you just plug in a keyword or two and hope for the best? That may be the quickest way to search, but with more than 3 billion pages in Google's index, it's still a struggle to pare results to a manageable number.

But Google is an remarkably powerful tool that can ease and enhance your Internet exploration. Google's search options go beyond simple keywords, the Web, and even its own programmers. Let's look at some of Google's lesser-known options.

Syntax Search Tricks

Using a special syntax is a way to tell Google that you want to restrict your searches to certain elements or characteristics of Web pages. Google has a fairly complete list of its syntax elements at


. Here are some advanced operators that can help narrow down your search results.

Intitle: at the beginning of a query word or phrase (intitle:"Three Blind Mice") restricts your search results to just the titles of Web pages.

Intext: does the opposite of intitle:, searching only the body text, ignoring titles, links, and so forth. Intext: is perfect when what you're searching for might commonly appear in URLs. If you're looking for the term HTML, for example, and you don't want to get results such as

www.mysite.com/index.html

, you can enter intext:html.

Link: lets you see which pages are linking to your Web page or to another page you're interested in. For example, try typing in


Google services

Google has a number of services that can help you accomplish tasks you may never have thought to use Google for.


Let Google help you figure out whether you've got the right spelling—and the right word—for your search. Enter a misspelled word or phrase into the query box (try "thre blund mise") and Google may suggest a proper spelling. This doesn't always succeed; it works best when the word you're searching for can be found in a dictionary. Once you search for a properly spelled word, look at the results page, which repeats your query. (If you're searching for "three blind mice," underneath the search window will appear a statement such as Searched the web for "three blind mice.") You'll discover that you can click on each word in your search phrase and get a definition from a dictionary.


(www.buzztoolbox.com/google/yellowsearch.shtml).


Extended Googling

Google offers several services that give you a head start in focusing your search. Google Groups


indexes literally millions of messages from decades of discussion on Usenet. Google even helps you with your shopping via two tools: Froogle
CODE

Google Alert


monitors your search terms and e-mails you information about new additions to Google's Web index. (Google Alert is not affiliated with Google; it uses Google's Web services API to perform its searches.).


This service affiliated with Google will prerform the same task as googlealert

Google API

In 2002, Google released the Google API (application programming interface), a way for programmers to access Google's search engine results without violating the Google Terms of Service. A lot of people have created useful (and occasionally not-so-useful but interesting) applications not available from Google itself, such as Google Alert. For many applications, you'll need an API key, which is available free from
CODE

for more.

Thanks to its many different search properties, Google goes far beyond a regular search engine. Give the tricks in this article a try. You'll be amazed at how many different ways Google can improve your Internet searching.


Monday, 22 December 2014

Recover hidden files your pen-drive / USB drive

Unable to view files in your USB drive? OR USB drive appears to be full but see nothing when you open it??

Heres a solution:
Step 1: Open Run by pressing 'windows key + r', and type in cmd
Step 2: Now just type the following command :
attrib -r -h -s \s \d 'drive letter':\*.* 
This will do the trick, now you will be able to view the files and folders in your drive.
Note: Such cases take place when there is a lack of good anti-virus software, so better get one or er a good one.


Sunday, 21 December 2014

Install Ubuntu on presinstalled 8.1 system!!


Prerequisites:
Back up Windows.There are two steps to backing up Windows:
1.Create a recovery drive for backing up Windows 8.1 
2.Create a file history for backing up personal files
For the recovery drive you will need a USB flash drive with at least 16gb of space. Insert the USB drive into your computer. You should make sure that you have no data that you need to keep on the drive as it will be wiped during this process. If you don't have a USB drive you can create recovery DVDs.
For the file history backup I would recommend using an external hard drive but it depends on how much data you have. If you don't have much then a USB drive will do. If you have nothing else to hand you can backup to DVDs.
Step 1:
Download the latest iso file of Ubuntu from here : http://www.ubuntu.com/download/desktop
Step 2:
Now to install ubuntu we need a media, like live DVD or Bootable USB.
I'm going to show you how to create a bootable USB of ubuntu. Download 'rufus' from here : https://rufus.akeo.ie/
Run rufus, and make sure the correct drive is selected.  
Now click on the disk icon and browse to the ubuntu iso. 
Now click start and sit back till the process it complete. 
Step 3:
Windows takes up the whole of the drive when it is first installed. In order to install Ubuntu you will need to make space for it.
Press the "super key" (Windows key) on your keyboard and click the magnifying glass in the top right corner. In the search box start typing "Partitions".
Click on the option called "Create and format partitions". This will bring up the "Disk Management" screen.


To shrink the drive, right click on the "OS (C:)" volume and select "Shrink volume".


A screen will appear showing how much you can shrink the drive by. You can of course choose to shrink the drive by less than offered but never go for any more than offered as you will break your Windows 8.1 operating system if you do.
Click "Shrink" to continue.
When you are finished you will see that there is a lot of unpartitioned space. This is where Ubuntu will be installed.

Step 4:

To be able to boot to your Ubuntu USB drive you will need to turn off the fast boot option.
 Press the "super" key (Windows key) and then click the magnifying glass in the top right corner.
Enter "Control Panel". Click on the "Control Panel" option that appears.
When the "Control Panel" appears click on the "System and Security" heading.


Now click on "Power Options".
On the following screen click on "Choose what the power button does".


A screen will appear with the heading "Define power buttons and turn on password protection".
Scroll down until you see "Shutdown Settings".
An option should be available called "Turn on fast startup" (recommended).
Uncheck this option.
Click "Save Changes".
 Step 5:
Turing of Secure boot: Restart your computer and press 'function key' to enter setup. This function key is different for different systems it can be any keybetween F1 to F12.
DELL users press F12 and follow the steps in Pictures 


HP users press F10 and follow the steps in pictures:


Step 6:
All set! Now we proceed to install Ubuntu!! After you save the secure boot settings, system will reboot, now press 'function key' to open the boot manager.                              NOTE: This function key will not always be the same as which we used the enter the system configuration or boot setup menu.
DELL users may use the same key i.e. F12, and  select the bootable USB drive which we made earlier.

HP users have to press F9 key and select the bootable USB drive which me made earlier.
After booting from the USB you will b taken to a black grub screen select the option "instal ubuntu".

Step 7:


The first thing you need to do is decide which language you would like to use.

Unless you feel like the challenge isn't great enough I would choose the language that you would normally use.

Click "Next" to continue.


The next screen lets you choose which internet connection to use whilst installing Ubuntu.

I always opt for not wanting to connect and there is a good reason for that.

I live in the countryside and my internet connection is poor. I don't want the installer failing half way through because the connection dropped.
I prefer to install the operating system and run updates as a separate task later on.
If you have a good broadband connection you may wish to connect to it now so that you download updates as you go. This will slow down the initial install but will save time later on as you won't have to install lots of updates.


When you click "Next" you will be shown a tick list highlighting how prepared you are for installing Ubuntu.

As you can see I have 2 ticks because I have enough disk space and I am plugged into a power source. I chose not to connect to a network as this stage (hence the cross).

Click "Continue".

In the past there used to be an option on the "Installation Type" screen to install alongside Windows.

If you are installing alongside Windows 7 on a non-EFI based system then you will still have that option.

Click on "Something Else" and click "Next".


The next screen may look rather intimidating but it is just showing your current disk layout. 
Be very careful with the next few steps. 
If you haven't taken that Windows backup, quit the installation, reboot and follow step 1 of this tutorial again. 
Look at the image above. You will see a large portion of free space (710155 MB). This is where I put Ubuntu.
The free space is going to be split into 3.
The first partition is for Ubuntu and will be 50 Gigabytes in size.
The second partition is for your home partition and stores configuration files and your personal files such as music, pictures etc.
The third partition is for swap space and is used for intensive operations and suspending the computer.When you have found the partition with free space, click on it and press the plus symbol (+) under the disk layout.
In the size box enter 50000, select logical as the partition type, select beginning of this space and choose EXT4 as the file system.

For the mount point choose / (this means root).

Click "OK".

The disk layout screen should now show a new partition for /.

Find the large section of free space again, click on it and press the plus symbol again (+).
This time you want to set the size to be the rest of the free disk space minus 2x the amount of memory in your computer.
If you have 8 gigabytes RAM, subtract 16 gigabytes.
Again choose "Logical" as the partition type, beginning of this space for where to put the partition and EXT4 as the file system.
For the mount point choose /home.
The issue of how much swap space to use is constantly up for debate. Some people say you don't need any at all, some go for 1.5 times the amount of RAM and some say 2x.
Unless disk space is at a premium I would just go for the 2x and have done with it.
In theory if you are running lots of intensive processes such as video editing then the swap space is used to store memory that isn't currently being used (swapped) to disk. This is disk intensive and slows down your computer but it will help to prevent a crash. Swap space is also used for suspending your computer.
Now find the free disk space again, click on it and press the plus symbol. (+).

Leave the size as the rest of the free disk space, choose logical as the file system and beginning of this space as the location.

Choose "swap area" as the mount point.

The final thing to concern yourself with when partitioning is where to install the boot loader.

By default it is set to /dev/SDA on the "Installation Type" screen. This can be changed but unless you are using multiple disks you should leave this well alone.
Press "Install Now" to continue.
The installation has now begun but whilst it is taking place you are asked a few configuration type questions.

First of all choose your location by clicking on the map.

Press "Continue".


The next screen asks you to choose your keyboard layout.

Simply choose the correct one for you and press "Continue".


You will now be required to create a default user.

Enter your name, a name to identify your computer, a username and a password.

You can also choose whether to log in automatically or require a password each time.


A progress bar will now show you how far through the installation you are.

You can also view a selection of messages telling you all about Ubuntu.

At this point you can take another comfort break and depending on your computer's speed you will either have time to boil an egg or wash your car.

At the end of the process you will be asked whether you want to reboot to start using Ubuntu or to continue using the live version.
 After the reboot you will be taken to another grub screen where you can can select whether to start Ubuntu or Windows.